Creating an Application Pool
The web applications installed by Service Desk and Asset Manager must be in their own IIS Application Pool on the web server. Before you can configure any Service Desk or Asset Manager applications or services, you need to create an Application Pool.
If you created your instance using the Standard Instance link (see Creating an instance), an Application Pool will already have been created that is prefixed with the instance name that you provided.
In some circumstances, you may choose to create more than one Application Pool for your system.
For more information about designing your system architecture, see the Ivanti Service Desk and Asset Manager Technical Specifications and Architecture Guidelines document.
To create an Application Pool:
- In the Ivanti Configuration Center, open the required instance.
- Alongside the Application Pools heading, click Create Application Pool.
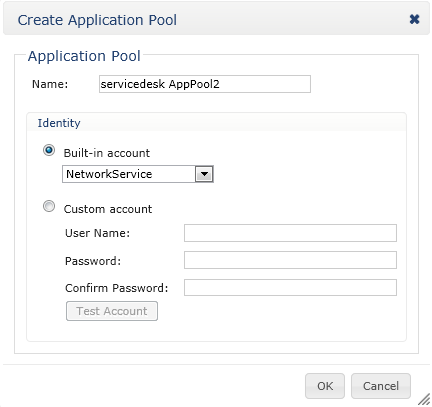
The Create Application Pool dialog appears.
- Type the required Name for the new Application Pool.
- Select the required Identity, then click OK.
The Application Pool is created, and the Available Applications section appears for the instance.
You can rename an existing Application Pool using the Edit link alongside the Application Pool's name. Other links alongside the Application Pool's name enable you to Recycle, Start, Stop, and Delete the Application Pool. If you have multiple Application Pools within the instance, links beneath the Application Pools title enable you to Recycle ALL, Start ALL, Stop ALL, and Delete ALL of the Application Pools at once.